Provide Sustainable Electric Bikes For Everyone
Malesuada fames ac turpis egestas. Interdum velit laoreet id donec. Eu tincidunt tortor aliquam nulla facilisi cras.


Look, I get it. You bought a road bike to ride it, not to spend your precious hours tinkering in a garage, smelling of degreaser and existential dread. The open road calls, the wind whispers promises of speed, and the last thing you want to think about is the gritty reality of a worn chain or a spongy brake lever. But here’s the thing: ignoring your bike’s cries for attention is like trying to conduct a symphony with a broken baton. Eventually, the music stops, and you’re left stranded, miles from home, with a silent, uncooperative machine.
This isn’t just about keeping your bike running; it’s about deepening your connection with it. It’s about understanding the subtle language of gears shifting smoothly, the reassuring bite of well-adjusted brakes, the almost imperceptible hum of a perfectly lubricated chain. It’s about transforming a chore into a ritual, a communion with the very essence of your ride. And frankly, it’s about saving yourself a small fortune in repair bills down the line. We’re not aiming for perfection here, but for a mindful engagement that ensures every pedal stroke is as efficient and joyful as the last. This article isn’t just a list of tasks; it’s an invitation to become a more attuned, more self-sufficient rider.
The Daily Ritual: Your Pre-Ride ABCs (and a little extra)
Before every ride, no matter how short, I perform a quick ritual. It takes less time than brewing your morning coffee, and it can genuinely save your ride – or even your skin. Think of it as your bike’s morning stretch, a quick check-in before it tackles the day’s challenges. The cycling world often boils this down to the ‘ABC’ check, and for good reason. It’s simple, effective, and covers the most critical components.
A is for Air: The Foundation of Your Ride
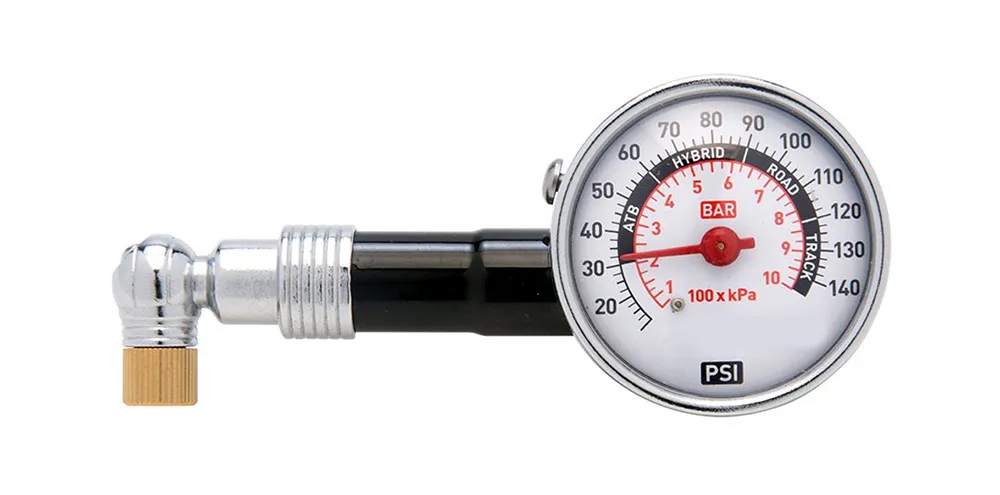
Ah, tire pressure. The unsung hero, often overlooked, yet absolutely fundamental to how your bike feels, handles, and performs. I remember reading a study, probably from some obscure cycling physics journal (don’t ask me to find it now, my digital bookmarks are a mess), that highlighted just how much rolling resistance is affected by even a few PSI. It’s not just about avoiding pinch flats, though that’s a huge bonus. Proper inflation makes your ride faster, more comfortable, and significantly safer.
Before every ride, give your tires a firm squeeze. They should feel, well, firm. Not rock hard, but certainly not squishy. For a more precise reading, and honestly, you should invest in one, use a dedicated tire pressure gauge. You’ll find the recommended PSI range printed on your tire’s sidewall – usually a small, almost hidden number. Don’t exceed it, and don’t go too far below it. My personal preference usually leans towards the lower end of the recommended range for a slightly more compliant ride, especially on rougher roads, but that’s a discussion for another day. While you’re down there, give the tire itself a quick visual inspection. Look for embedded glass, thorns, or any suspicious cuts. A small shard caught now can save you a roadside repair later. And for goodness sake, make sure your quick-release skewers or thru-axles are properly tightened. A wobbly wheel is a fast track to a bad day.
B is for Brakes: Your Lifeline to Control
Brakes. They’re not just for stopping; they’re for controlling your speed, navigating descents, and ultimately, keeping you out of harm’s way. A well-maintained braking system is your best friend when that unexpected car pulls out or a squirrel decides to play chicken with your front wheel. Here’s the crisp, chemical scent of new brake pads – a smell that always reminds me of safety and control.
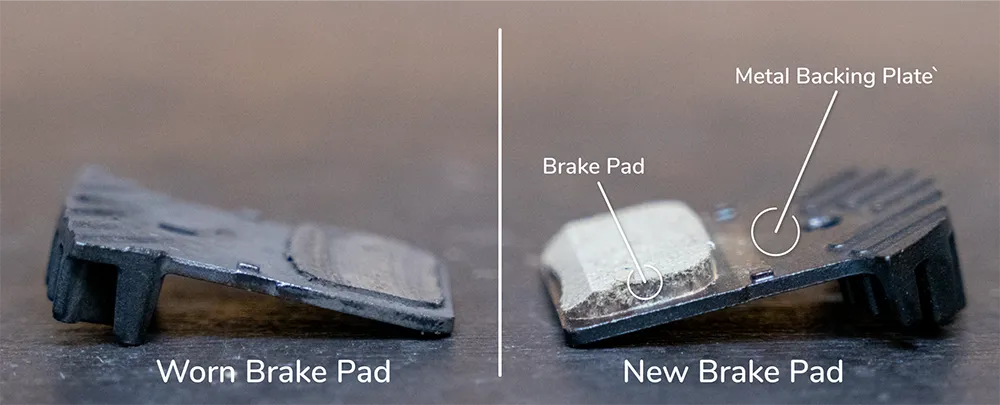
Squeeze both brake levers, one at a time, then together. Do they feel firm and responsive? Do they engage well before hitting the handlebars? If they feel spongy, or if you have to pull them almost to the bar to get any stopping power, something’s amiss. For rim brakes, check that the pads are making full contact with the rim and aren’t worn down to the metal. For disc brakes, visually inspect the pads for wear – they usually have a wear indicator line. If they’re looking thin, it’s time for a replacement. Also, ensure the brake calipers are centered and not rubbing the rim or rotor. A slight rub can be annoying; a constant rub can be dangerous and slow you down. This is one area where you absolutely do not want to be strategically imperfect.
C is for Chain: The Heartbeat of Your Drivetrain
Your chain is the literal link between your effort and your forward motion. It’s the workhorse, constantly grinding, flexing, and transferring power. A neglected chain is a noisy, inefficient, and rapidly wearing chain. It’s the staticky hum of an old, overworked server – a sign of impending failure.
Spin your pedals backward and watch the chain as it moves through the cassette and derailleurs. Does it run smoothly? Is it excessively dirty or rusty? Does it make any grinding or squeaking noises? If so, it’s crying out for attention. We’ll dive deeper into cleaning and lubrication shortly, but for now, a quick visual check and an ear for unusual sounds will suffice. Also, give your crank arms a gentle wiggle. Any play here indicates loose bottom bracket bearings or crank bolts, which need immediate attention. This isn’t just about efficiency; it’s about preventing catastrophic failure mid-ride.

The Deep Clean: When Grime Becomes a Crime
After a particularly spirited ride, especially one that involved an unexpected downpour or a detour through a gravel patch, your bike will inevitably look less like a sleek machine and more like a mud-splattered warhorse. And while a little dirt adds character, too much grime is, quite frankly, a crime against your components. It accelerates wear, reduces efficiency, and can turn a smooth-running drivetrain into a symphony of squeaks and groans. This isn’t just about aesthetics; it’s about longevity and performance.
The Art of the Drivetrain Wash
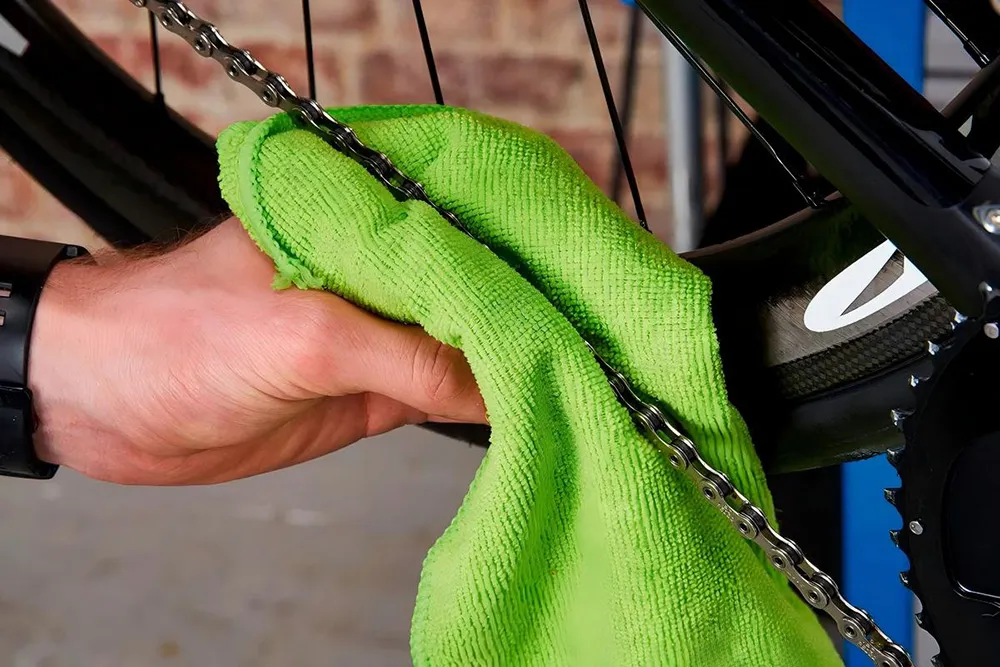
Your drivetrain – the chain, cassette, and chainrings – is the beating heart of your bike, and it’s also the most exposed to the elements. It collects road grit, chain lube residue, and all sorts of unpleasantness. Cleaning it isn’t glamorous, but it’s arguably the most impactful maintenance task you can perform. For a basic clean, a bucket of warm, soapy water (diluted dish soap works wonders for the frame and general grime), a few brushes, and some dedicated degreaser are your best friends. Here’s a pro tip: avoid high-pressure washers near your bike’s bearings (hubs, bottom bracket, headset). That high-pressure spray can force water past seals, washing out grease and introducing contaminants, leading to premature wear. Trust me, I learned that the hard way with a very expensive headset replacement.
Start with the chain. For light grime, a good wipe-down with a rag soaked in degreaser can suffice. But for a truly gunked-up chain, a chain cleaning tool is a revelation. These clever contraptions clamp onto your chain and, with a few rotations of the pedals, scrub away years of neglect. Follow the degreaser with a thorough rinse (again, low pressure!) and let it dry completely. A clean chain is a happy chain.
Next, tackle the cassette and chainrings. Use a stiff brush and degreaser to scrub away the accumulated crud. Those little gaps between the cogs on your cassette are notorious for hoarding grime. Some riders use an old toothbrush, others a dedicated cassette brush. The goal is to get them sparkling. Don’t forget your derailleur pulleys – they spin constantly and collect a surprising amount of gunk. A small brush and a careful hand will do the trick.
Lubrication: The Elixir of Smoothness
Once your drivetrain is gleaming, it’s time for lubrication. This is where many riders go wrong, either using the wrong lube or, more commonly, over-lubricating. Too much lube attracts more dirt, creating a sticky, abrasive paste that defeats the purpose of cleaning. Think of it like a fine wine – a little goes a long way.
There are two main types of chain lube: wet and dry. Wet lube is thicker, more durable, and designed for wet, muddy conditions. It clings tenaciously to your chain, resisting wash-off. The downside? It’s a magnet for dirt, so you must wipe off the excess after application. Dry lube is thinner, often wax-based, and ideal for dry, dusty conditions. It attracts less dirt but washes off easily in the rain. My advice? Have both. Choose your lube based on the conditions you expect to ride in. If you’re unsure, a good all-rounder or a wax-based lubricant is often a safe bet.
To apply, slowly drip lube onto each chain link as you pedal backward. Don’t just squirt it indiscriminately. Aim for the rollers, where the magic happens. Let it sit for a few minutes – this allows the lube to penetrate the inner workings of the chain. Then, and this is crucial, wipe off all excess lube with a clean rag. You want the lube inside the chain, not coating the outside where it can pick up grit. A properly lubricated chain should look almost dry on the outside, but feel smooth and silent as it runs.
Don’t forget other pivot points: derailleur pivots, brake lever pivots, and even pedal cleats can benefit from a tiny drop of appropriate lubricant. Just remember the golden rule: less is more, and wipe off the excess.
The Silent Strength: Bolts, Torque, and the Art of the Snug Fit
Your bike, at its core, is a collection of tubes and components held together by a myriad of bolts. From the stem clamping your handlebars to the seatpost holding your saddle, each bolt plays a critical role in the structural integrity and safety of your ride. And yet, how often do we truly consider them beyond a cursory glance? Ignoring these small but mighty fasteners is like building a house with loose nails – it might stand for a while, but eventually, something’s going to give. The goal here isn’t to become a torque-wrench-wielding maniac, but to appreciate the delicate balance between too loose and too tight.
The Goldilocks Zone: Torque Specs and Why They Matter
Here’s the thing: bolts aren’t just there to be tightened until they feel right. Each bolt on your bike, especially on modern carbon fiber frames and components, has a specific torque specification. This is the amount of rotational force that should be applied to the fastener. Over-tighten, and you risk stripping threads, cracking carbon, or deforming components – a costly mistake. Under-tighten, and parts can slip, creak, or worse, come loose mid-ride, leading to a spectacular (and painful) dismount. I remember a friend who, in a fit of overzealous tightening, crushed his carbon seatpost. A moment of brute force, a lifetime of regret (and a lighter wallet).
This is where a torque wrench becomes your indispensable companion. It’s not an extravagance; it’s a necessity, particularly if you own a carbon bike. Most common bolts on a road bike will be 4mm or 5mm hex, and their torque specs typically range from 4-8 Nm (Newton-meters). Always consult your component manufacturer’s guidelines or your bike’s owner’s manual for precise figures. Don’t guess. Don’t rely on “feel.” Use the right tool for the job. It’s a small investment that protects much larger ones.
Beyond specific torque, a general M-check (or W-check, depending on how you visualize it) is a good habit. Starting from the front wheel, move up to the handlebars, down the fork, along the frame, to the rear wheel, and back up to the saddle. As you go, give every bolt a quick check for tightness. It’s a tactile way to ensure everything is where it should be and nothing has vibrated loose.
Wheels: The Rolling Foundation
Your wheels are, quite literally, what connect you to the road. They absorb bumps, transfer power, and dictate much of your bike’s handling characteristics. Neglecting them is like ignoring the foundation of a house – eventually, things will get shaky.
Tire Inspection: We touched on pressure, but a deeper dive into tire health is warranted. Beyond looking for embedded debris, regularly check the sidewalls for cracks or bulges. These are signs of impending failure. Also, look at the tread. While road bike tires often have minimal tread, some have wear indicators – small dimples that disappear when the tire is worn out. If you see casing threads showing through, you’re well past due for a replacement. A worn tire is more prone to punctures and offers less grip, especially in wet conditions.
Wheel Trueness: Spin your wheels and watch the rim. Does it wobble from side to side? This is called being “out of true.” A slightly untrue wheel might just cause annoying brake rub, but a severely untrue wheel can affect handling and even lead to spoke failure. Truing a wheel is an art form, best left to experienced mechanics unless you’re keen to learn a new skill (and have a truing stand). However, knowing when your wheel needs attention is the first step.
Hub Play: Grab the wheel at the rim and try to wiggle it from side to side. Is there any play? If so, your hub bearings might be loose or worn. This is another job that can be tackled at home with the right tools and a bit of patience, but a bike shop can quickly diagnose and fix it. Smooth-spinning hubs are essential for efficient power transfer and a quiet ride.
The Unseen Connections: Cables, Shifting, and the Art of Communication
Think of your bike’s cables as its nervous system, transmitting your commands from the levers to the derailleurs and brakes. They’re often out of sight, tucked away in housings, silently doing their job. But like any communication system, if the lines get frayed, stretched, or contaminated, the message gets lost, leading to sluggish shifting, unresponsive braking, and a generally frustrating ride. It’s a subtle dance, this interplay between rider input and mechanical response, and smooth cables are the choreographers.
Shifting Gears: A Symphony of Precision
There’s nothing quite as satisfying as a crisp, precise gear change. That almost imperceptible click as the chain glides from one cog to the next, the immediate response to your command – it’s a testament to a well-tuned drivetrain. Conversely, there’s little more annoying than a hesitant shift, a chain that grinds, or a derailleur that refuses to cooperate. This usually points to issues with your shift cables or derailleur adjustment.
Cable Health: Over time, shift and brake cables stretch, and the housing they run through can accumulate dirt and moisture. This friction makes shifting and braking feel sluggish. If your shifting has become less precise, or if your brake levers feel stiff, it might be time to inspect your cables. Look for fraying at the ends, especially near the levers and derailleurs. If you see rust or kinks, it’s definitely time for a replacement. Replacing cables and housing is a moderately involved task, but a rewarding one. It’s like giving your bike a fresh set of vocal cords – suddenly, it sings again.
Derailleur Adjustment: Your derailleurs are the mechanisms that move your chain between gears. They have limit screws that prevent the chain from going too far inward (into the spokes) or too far outward (off the smallest cog). They also have a barrel adjuster, usually located near the shifter or on the derailleur itself, which fine-tunes cable tension. If your chain is skipping gears, struggling to shift up or down, or making excessive noise, a small adjustment to the barrel adjuster can often work wonders. Turn it clockwise to loosen cable tension (for slower shifts to smaller cogs) and counter-clockwise to tighten (for faster shifts to larger cogs). This is a delicate process, a millimeter can make a difference, and it’s one of those things that feels incredibly satisfying to get just right. I’ve spent many an evening in the garage, listening intently to the subtle clicks and clacks, trying to achieve that perfect harmony.
Other Essential Checks: The Little Things That Matter
While the ABCs and drivetrain care cover the major bases, a few other areas deserve your attention to ensure a truly reliable ride.
Headset Check: Your headset allows your front wheel and fork to turn smoothly. To check for play, stand over your bike, apply the front brake, and rock the bike back and forth. If you feel a clunking sensation or see movement where the fork meets the frame, your headset might be loose. This can be adjusted, but if left unchecked, it can lead to premature bearing wear and compromised steering. A smooth-turning headset is crucial for confident handling, especially at speed.
Bottom Bracket: This is where your crank arms attach to the frame, allowing you to pedal. To check for play, grab both crank arms and try to wiggle them side to side. Any movement indicates a loose or worn bottom bracket. Like the headset, this requires specialized tools for replacement, but identifying the issue early can prevent further damage to your frame or cranks.
Pedals: Give your pedals a spin. Do they turn freely and smoothly? Do they make any grinding noises? If not, they might need new bearings or a fresh application of grease. Also, check your cleats (if you use clipless pedals) for excessive wear. Worn cleats can lead to inefficient power transfer and difficulty clipping in or out – a potentially dangerous situation.
Frame Inspection: Periodically, give your frame a thorough visual inspection. Look for any cracks, dents, or unusual paint bubbling, especially around welds or high-stress areas like the head tube, bottom bracket, and dropouts. For carbon frames, pay extra attention to any signs of impact or delamination. While rare, a compromised frame is a serious safety concern. This is where a keen eye and a good light source come in handy. It’s like being a detective, searching for clues that your bike might be trying to tell you something.
The Rhythmic Cycle: Establishing Your Maintenance Schedule
Just like a well-trained athlete follows a training plan, your bike thrives on a consistent maintenance schedule. It’s not about obsessive daily checks (though the ABCs are non-negotiable), but about understanding the rhythm of wear and tear. Different components have different lifespans and require varying levels of attention. Establishing a routine transforms maintenance from a reactive chore into a proactive habit, ensuring your bike is always ready for its next adventure. Think of it as preventative medicine for your two-wheeled companion.
Daily/Pre-Ride Checks: The Non-Negotiables
These are the quick, essential checks we’ve already covered. They take minutes, but their impact on safety and performance is immeasurable.
Tires: Check pressure and visually inspect for damage.
Brakes: Ensure levers are firm and responsive, and pads are engaging correctly.
Chain: Quick visual check for excessive grime or rust, listen for squeaks.
Quick Releases/Thru-Axles: Confirm they are securely fastened.
Weekly/Every Few Rides: The Deeper Dive
If you’re riding regularly, especially in varied conditions, these checks become crucial for preventing minor issues from escalating.
Drivetrain Clean & Lube: As detailed above, a thorough cleaning and proper lubrication of your chain, cassette, and chainrings will significantly extend their life. This is your primary defense against premature wear.
Frame Wipe-Down: A quick wipe-down of the frame removes sweat, road grime, and dust, preventing corrosion and making it easier to spot potential issues.
Bolt Check: A more thorough M-check, paying attention to stem bolts, seatpost clamp, and crank bolts. A gentle touch with a torque wrench on critical bolts isn’t a bad idea here.
Brake Pad Wear: A closer look at your brake pads (rim or disc) to assess wear levels. Catching them before they’re metal-on-metal saves your rims or rotors.
Cable Inspection: Check for fraying or stickiness in your brake and shift cables.
Monthly/Every 200-300 Miles: The Tune-Up Essentials
This is where you start getting into the nitty-gritty, the adjustments that keep everything running smoothly and quietly.
Derailleur Adjustment: Fine-tune your front and rear derailleurs using the barrel adjusters to ensure crisp, precise shifting. If you’re struggling, there are plenty of online tutorials, or a quick trip to your local bike shop can get you sorted.
Wheel Trueness Check: Spin your wheels and look for wobbles. Minor wobbles can often be corrected with a spoke wrench, but if you’re unsure, a mechanic is your best bet.
Headset & Bottom Bracket Play: Re-check for any play in these critical bearing areas. Adjust if necessary.
Tire Condition: A more thorough inspection for cuts, bulges, or excessive wear. Consider rotating tires if one is wearing faster than the other.
Pedal & Cleat Inspection: Check pedal bearings for smoothness and cleats for wear.
Annually/Every 1000-2000 Miles: The Professional Touch (or the Ambitious DIYer)
Some tasks are best left to the pros, or to those with a dedicated workshop and a good deal of mechanical aptitude. These are the deeper dives that ensure long-term health.
Bearing Overhaul: Headset, bottom bracket, and wheel hub bearings need to be cleaned, re-greased, and potentially replaced. This is a messy job requiring specialized tools.
Cable & Housing Replacement: Even if they look okay, cables and housing can degrade internally. Replacing them annually ensures optimal braking and shifting performance.
Brake Bleed (Hydraulic Discs): Hydraulic disc brakes require periodic bleeding to remove air bubbles and refresh the fluid. This is a specialized task.
Spoke Tension Check: A mechanic can check and equalize spoke tension, which is crucial for wheel strength and longevity.
Chain & Cassette Replacement: Chains wear out. A worn chain will accelerate wear on your cassette and chainrings. Use a chain wear indicator tool; if it shows significant stretch, replace the chain. Often, if you replace the chain regularly, your cassette will last longer. If you let the chain go too long, you’ll likely need a new cassette too. It’s a classic domino effect in the cycling world.
The Toolkit: Your Mechanical Allies
To embark on this journey of self-sufficiency, you don’t need a fully stocked professional workshop. But a few essential tools will make your life infinitely easier and empower you to tackle most routine maintenance tasks. Think of them as your mechanical allies, each with a specific purpose in the ongoing battle against wear and tear.
Floor Pump with Gauge: Absolutely non-negotiable. A good pump makes tire inflation quick and accurate. The integrated gauge is key for hitting those precise PSI numbers.
Tire Levers: For those inevitable flat tires. Get a sturdy set; plastic ones can snap.
Multi-Tool: A compact tool with various hex keys (Allen wrenches), screwdrivers, and sometimes a chain breaker. Perfect for on-the-go adjustments and many home tasks.
Hex Key Set (Allen Wrenches): A good set of individual hex keys (2mm, 2.5mm, 3mm, 4mm, 5mm, 6mm, 8mm) offers better leverage and comfort than a multi-tool for home use.
Torque Wrench: As discussed, essential for carbon components and critical fasteners. Don’t skimp here.
Chain Lube: Wet and dry varieties, or a good all-rounder.
Degreaser: Environmentally friendly options are widely available.
Clean Rags & Brushes: Plenty of them. Old toothbrushes are excellent for tight spots.
Chain Wear Indicator Tool: A simple, inexpensive tool that tells you exactly when your chain needs replacing, saving your cassette from premature wear.
Bike Repair Stand: While not strictly essential for beginners, a repair stand elevates your bike to a comfortable working height, making cleaning, lubrication, and adjustments significantly easier. It’s a game-changer for home mechanics.
This isn’t an exhaustive list, but it’s a solid foundation. As you become more confident, you might expand your toolkit to include spoke wrenches, cassette tools, bottom bracket tools, and more. But for now, these allies will serve you well.
The Zen of the Wrench: A Concluding Thought
So, there you have it. A journey through the often-overlooked world of road bike maintenance. It started with a confession – the desire to just ride, to escape the mundane. But as we’ve explored, the mundane can become profound. The act of cleaning your chain, adjusting your brakes, or checking your tire pressure isn’t just about keeping a machine operational. It’s a meditative practice, a way to slow down, to connect with the physical world, and to appreciate the engineering marvel beneath you.
There’s a certain satisfaction that comes from knowing your bike intimately, from understanding its quirks and anticipating its needs. It’s the quiet confidence that comes from a perfectly tuned machine, a machine that responds to your every command with grace and efficiency. It’s the knowledge that you’ve done your part, that you’ve honored the craftsmanship, and that you’re ready for whatever the road throws at you. The open road still calls, the wind still whispers, but now, the symphony plays on, uninterrupted, a testament to your care and attention. And that, my friends, is a beautiful thing.