
Gravel biking has exploded in popularity over the past few years—and for good reason. It’s the perfect blend of road cycling’s speed, mountain biking’s adventure, and casual riding’s freedom, offering a way to escape crowded city streets and explore quiet country roads, forest trails, and unpaved paths that road bikes can’t handle. If you’re a beginner curious about gravel biking—whether you’re a road cyclist looking to branch out, a mountain biker wanting a smoother ride, or someone new to cycling altogether—this ultimate guide is for you.
Table of Contents
Unlike road cycling (which sticks to smooth pavement) or mountain biking (which focuses on technical singletrack), gravel biking is all about versatility. It’s about riding where the pavement ends, discovering hidden routes, and embracing the “go-anywhere” spirit of cycling. The best part? You don’t need to be an elite athlete or have a closet full of expensive gear to get started. With the right basics—from choosing a bike to mastering essential skills, planning your first ride, and staying safe—you’ll be hitting the gravel with confidence in no time.
In this comprehensive guide, we’ll break down everything a beginner needs to know about gravel biking, no jargon or prior experience required. We’ll cover how to choose the right gravel bike (or adapt a bike you already have), essential gear to keep you comfortable and safe, key skills to master before hitting rough terrain, how to plan your first gravel rides, common mistakes to avoid, and tips to help you grow as a gravel rider. By the end, you’ll have all the knowledge and confidence to dive into this exciting, accessible sport—and fall in love with the freedom of gravel.
First: What Even Is Gravel Biking?
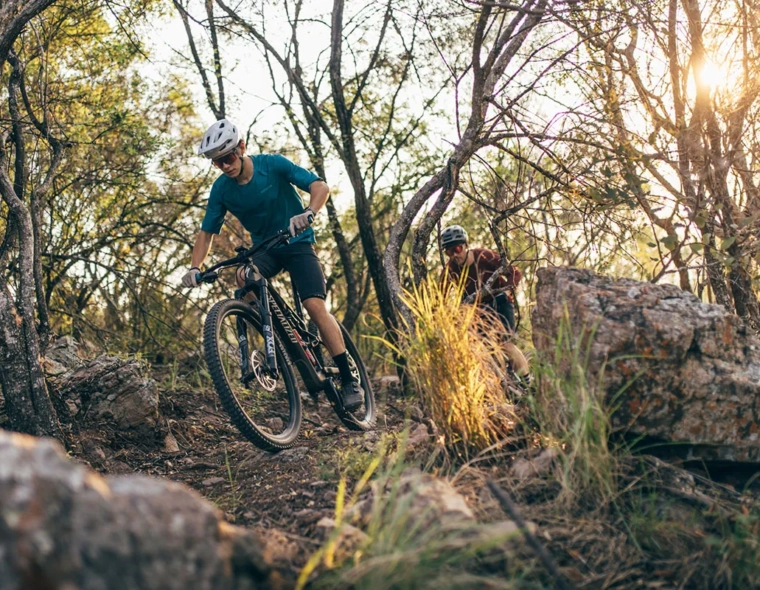
Let’s start with the basics: what makes gravel biking different from other types of cycling? At its core, gravel biking is riding on unpaved or partially paved surfaces—think gravel roads, dirt paths, crushed stone, packed sand, and even light mud—using a bike designed to handle these conditions. It’s not as technical as mountain biking (you won’t be tackling steep, rocky singletrack or big jumps) and not as restrictive as road biking (you’re not limited to smooth pavement).
Gravel biking is all about exploration. It’s for riders who want to escape the noise of cars, discover new routes, and enjoy the scenery without the pressure of keeping up with a fast road group or navigating tricky mountain trails. It’s also incredibly inclusive: whether you’re 18 or 80, a casual rider or someone looking to challenge themselves, gravel biking meets you where you are. You can take it slow, stop to enjoy the views, or push yourself to ride farther and faster—there’s no “right” way to do it.
One of the best things about gravel biking is its versatility. A good gravel bike can handle pavement, gravel, dirt, and even light trail, making it the only bike you need for most riding adventures. It’s perfect for weekend getaways, daily commutes (if you have unpaved shortcuts), and everything in between. If you’ve ever thought, “I wish I could ride my bike somewhere more interesting,” gravel biking is the answer.
Choosing Your Gravel Bike: New, Used, or Adapted?
The most important piece of gear for gravel biking is, of course, the bike. But you don’t need to spend thousands of dollars on a brand-new gravel bike to get started. There are three great options for beginners: buying a new entry-level gravel bike, buying a used gravel bike, or adapting a bike you already own. Let’s break down each option, so you can choose what’s best for your budget and goals.
Option 1: Entry-Level New Gravel Bikes (Best for Long-Term Use)
If you’re serious about gravel biking and want a bike that will grow with you, an entry-level new gravel bike is a great investment. Most major brands (like Specialized, Trek, Giant, Cannondale, and Scott) offer beginner-friendly gravel bikes for $1,000–$2,000—far less than high-end models, but still built to handle gravel roads and light trails.
What to look for in an entry-level gravel bike:
- Frame Material: Aluminum is the most common (and affordable) frame material for entry-level gravel bikes. It’s lightweight, durable, and resistant to dents and scratches—perfect for beginners who might bump into rocks or curbs. Carbon fiber is lighter and more comfortable, but it’s more expensive and less forgiving if you crash.
- Tire Clearance: This is critical for gravel biking. Look for a bike that can fit tires between 38mm and 45mm wide (measured in millimeters). Wider tires provide more traction on loose gravel, absorb more road vibrations, and are less likely to get punctures. Avoid bikes with tire clearance under 35mm—they’ll be too narrow for most gravel surfaces.
- Gearing: Gravel biking often involves hills (both paved and unpaved), so you’ll want a wide range of gears. Look for a bike with a 1x (single chainring) or 2x (double chainring) drivetrain with a large cassette (e.g., 11-46t or 11-50t). This will make climbing steep gravel hills much easier—no one wants to walk their bike up a hill on their first ride!
- Disc Brakes: All modern gravel bikes come with disc brakes (either mechanical or hydraulic), and for good reason. Disc brakes provide better stopping power than rim brakes, especially in wet or muddy conditions (common on gravel). Hydraulic disc brakes are smoother and require less maintenance, but mechanical disc brakes are more affordable and easier to adjust.
- Comfort Features: Look for a bike with a slightly more relaxed geometry than a road bike (this reduces strain on your back and neck during long rides), a wide handlebar (for better control on loose gravel), and mounts for accessories (like water bottles, a rack, or fenders—useful for commuting or long rides).
Entry-level gravel bikes to consider: Specialized Diverge E5, Trek Checkpoint ALR 5, Giant Revolt Advanced 2, Cannondale Topstone 4, Scott Speedster Gravel 10.
Option 2: Used Gravel Bikes (Best for Budget-Conscious Beginners)
If you’re on a tight budget, a used gravel bike is a fantastic option. You can find high-quality used gravel bikes for $500–$1,000—often from riders who upgraded to a more expensive model and took good care of their old bike.
Tips for buying a used gravel bike:
- Buy from a Reputable Source: Stick to local bike shops (they often sell certified pre-owned bikes that have been inspected and serviced), trusted online marketplaces (like Facebook Marketplace, Craigslist, or Pinkbike), or friends/family who ride. Avoid buying from unknown sellers with no photos or details.
- Check for Wear and Tear: Inspect the frame for dents, cracks, or rust (aluminum frames are rust-resistant, but steel frames can rust). Check the brakes (make sure they stop smoothly and the brake pads aren’t worn down), the drivetrain (the chain should be clean and not too loose, the gears should shift smoothly), and the tires (look for cuts, punctures, or excessive wear).
- Test Ride It: Always test ride a used bike before buying. Ride it on pavement and a small patch of gravel (if possible) to make sure it shifts smoothly, brakes well, and feels comfortable. Pay attention to any strange noises (like creaks or squeaks) and how the bike handles—if it feels unstable or hard to control, it’s not the right bike for you.
- Ask Questions: Ask the seller how often they rode the bike, what terrain they rode it on, and if it’s had any repairs or upgrades. A honest seller will be happy to answer your questions and provide details about the bike’s history.
Option 3: Adapt a Bike You Already Own (Best for Trying Gravel Without Investment)
If you already have a road bike or mountain bike, you might be able to adapt it for gravel biking—perfect for testing the sport without buying a new bike. This works best for road bikes with wide tire clearance or mountain bikes with a more relaxed geometry.
Adapting a road bike for gravel:
- Check tire clearance: Your road bike needs to fit at least 35mm-wide tires (38mm+ is better). If it only fits 28mm–32mm tires, it’s too narrow for most gravel.
- Swap the tires: Replace your road tires with gravel tires (38mm–45mm wide) with a tread pattern designed for loose surfaces (we’ll cover tire types later).
- Lower the tire pressure: Gravel tires need lower pressure (25–35 psi) than road tires (80–100 psi) to provide more traction and comfort. Start with 30 psi and adjust based on terrain and your weight.
Adapting a mountain bike for gravel:
- Swap the tires: Replace your mountain bike’s knobby trail tires with smoother gravel tires (38mm–45mm wide). Knobby tires will slow you down on gravel and pavement, while gravel tires provide better speed and traction.
- Adjust the suspension (if applicable): If your mountain bike has front suspension, lock it out for gravel riding. This will make pedaling more efficient and prevent the suspension from bouncing on rough gravel.
- Raise the tire pressure: Mountain bike tires are usually run at 20–30 psi for trails—raise it to 30–35 psi for gravel to reduce rolling resistance.
Note: Adapting a bike is a great way to try gravel, but it’s not a long-term solution. Road bikes lack the gearing and durability for rough gravel, and mountain bikes are heavier and less efficient on pavement and smooth gravel. If you fall in love with gravel biking, you’ll eventually want a dedicated gravel bike.
Essential Gravel Biking Gear for Beginners (You Don’t Need Everything!)
One of the biggest myths about gravel biking is that you need a ton of expensive gear to get started. The truth is, you only need a few essential items to stay safe, comfortable, and prepared for your first gravel rides. As you gain experience, you can add more gear—but start simple. Here’s what you need:
1. Safety Gear (Non-Negotiable)
- Bike Helmet: This is the most important piece of gear—never ride without one. Look for a helmet that fits snugly (it shouldn’t move around on your head), has good ventilation, and meets safety standards (like CPSC or EN 1078). You don’t need a fancy helmet—an entry-level road or mountain bike helmet works perfectly for gravel.
- Flat Tire Repair Kit: Gravel roads are full of thorns, rocks, and sharp debris—flat tires are inevitable. Your kit should include: 2–3 inner tubes (matching your tire size), a tire lever (to remove the tire from the rim), a portable pump or CO2 inflator (CO2 is faster, but a pump is more reliable), and a patch kit (for emergency repairs if you run out of inner tubes).
- Water Bottle and Cage: Dehydration is a risk on any bike ride, especially gravel rides (which often take place in remote areas with no water stops). Mount a water bottle cage on your bike and bring at least one full water bottle (500ml–750ml) for rides under 2 hours. For longer rides, add a second water bottle or a hydration pack.
2. Comfort Gear (Make Your Rides More Enjoyable)
- Cycling Shorts: Gravel rides can be bumpy, so a good pair of cycling shorts with a padded chamois (the padded insert) will reduce friction and keep your butt comfortable. Look for shorts made of breathable, moisture-wicking fabric—avoid cotton (it gets wet and chafes). Entry-level shorts cost $30–$60 and work great for beginners.
- Cycling Shoes (Optional, But Recommended): While you can ride in regular sneakers (using platform pedals), cycling shoes with cleats (that clip into clipless pedals) will make your rides more efficient. They allow you to pull up on the pedals as well as push down, which saves energy on long rides and climbs. If you’re new to clipless pedals, start with SPD cleats (they’re easier to clip in/out of than road cleats) and entry-level cycling shoes ($50–$100).
- Sunglasses: Gravel roads kick up dust, rocks, and debris—sunglasses protect your eyes from the sun, wind, and flying particles. Look for sunglasses with UV protection and interchangeable lenses (for different light conditions) if possible.
3. Navigation Gear (Avoid Getting Lost)
- GPS Head Unit or Phone Mount: Gravel rides often take place in remote areas with no street signs, so navigation is key. A basic GPS head unit (like Garmin Edge 130 Plus or Wahoo ELEMNT Bolt) is perfect for beginners—it tracks your route, distance, speed, and elevation, and you can preload routes. If you don’t want to buy a GPS, use a phone mount (attached to your handlebar) and a navigation app like Strava, Komoot, or Ride with GPS (download routes offline before your ride, so you don’t need cell service).
- ID and Emergency Contact Info: Always carry your ID (driver’s license or passport) and a card with your emergency contact info (name, phone number, and any medical conditions) in case of an accident. You can keep it in your phone case, a small bag on your bike, or a wristband.
4. Optional Gear (Add Later as You Progress)
- Handlebar Bag or Seat Bag: For carrying your flat tire kit, ID, snacks, and other small items. A handlebar bag is easy to access while riding, and a seat bag is out of the way.
- Snacks: For rides longer than 1–2 hours, bring energy snacks like bananas, energy bars, gels, or nuts to keep your energy levels up.
- Fenders: If you ride in wet conditions, fenders will keep mud and water off your clothes and bike.
- Lighting: If you ride early in the morning, late at night, or in low-light conditions (like forests), front and rear lights are a must for safety.
Gravel Bike Tires: The Most Important Upgrade You Can Make
Your tires are the only part of your bike that touches the ground—so choosing the right gravel tires is critical for comfort, traction, and safety. Unlike road tires (smooth) or mountain bike tires (knobby), gravel tires are designed to balance speed on pavement with traction on loose gravel, dirt, and sand.
Here’s what beginners need to know about gravel bike tires:
Tire Size
As we mentioned earlier, the ideal tire size for beginners is 38mm–45mm wide (measured in millimeters). Here’s why:
- 38mm–40mm: Perfect for beginners who ride a mix of pavement and gravel. They’re fast on pavement and provide enough traction for most gravel roads. Great for flat to rolling terrain.
- 41mm–45mm: Better for rough gravel, dirt, or sandy terrain. They provide more traction and absorb more vibrations, making bumpy rides more comfortable. They’re slightly slower on pavement, but worth it for rough terrain.
Always check your bike’s tire clearance before buying new tires—you don’t want to buy tires that are too wide for your frame or fork.
Tire Tread Patterns
Gravel tires come in three main tread patterns, each designed for different terrain. As a beginner, choose a tread pattern that matches the terrain you’ll ride most:
- Semi-Slick (Smooth Center, Light Side Tread): Best for mixed terrain (pavement + gravel). The smooth center provides speed on pavement, while the light side tread provides traction on loose gravel. Perfect for beginners who want versatility. Examples: Continental Terra Speed, Vittoria Terreno Dry.
- All-Terrain (Moderate Tread All Around): Best for rough gravel, dirt, and light mud. The moderate tread provides good traction on loose surfaces without slowing you down too much on pavement. Examples: Specialized Pathfinder Pro, Trek Bontrager GR1 Team Issue.
- Aggressive Tread (Deep Knobs): Best for muddy, sandy, or very rough terrain. The deep knobs provide maximum traction, but they’re slow on pavement. Not recommended for beginners—stick to semi-slick or all-terrain unless you’re riding mostly mud/sand.
Tire Pressure
Tire pressure is one of the most overlooked aspects of gravel biking—but it makes a huge difference in comfort and traction. Unlike road bikes (which use high pressure for speed), gravel bikes use lower pressure to allow the tire to conform to the terrain, providing more traction and absorbing vibrations.
Recommended tire pressure for beginners:
- 38mm–40mm tires: 28–35 psi (pounds per square inch)
- 41mm–45mm tires: 25–32 psi
Adjust based on your weight (heavier riders need slightly higher pressure, lighter riders need slightly lower), terrain (lower pressure for rough gravel, higher pressure for pavement), and tire width (wider tires can run lower pressure safely). Start with the middle of the range and experiment to find what feels most comfortable and provides the best traction.
Essential Gravel Biking Skills for Beginners
Gravel biking is easier than mountain biking, but it still requires a few basic skills to stay safe and comfortable on unpaved terrain. The good news is that these skills are easy to learn—you just need a little practice. Here are the most important skills for beginners to master:
1. Riding on Loose Gravel (The Most Important Skill)
Loose gravel is the most common terrain you’ll encounter on gravel rides—and it can feel unstable at first. The key to riding on loose gravel is to stay relaxed and keep your bike straight:
- Keep your weight centered: Don’t lean too far forward or backward—keep your body over the bottom bracket (the part of the frame where the crank attaches). This helps maintain traction on both wheels.
- Relax your grip: Don’t death-grip the handlebars—keep your hands loose. This allows the bike to move slightly under you, which helps it stay balanced on loose gravel.
- Look ahead: Don’t stare at your front wheel—look 10–15 feet ahead of you. This allows you to see rough spots or loose patches and adjust before you hit them.
- Maintain a steady speed: Don’t slow down too much—steady speed helps the bike stay balanced. If you need to slow down, brake gently (use both brakes) and avoid sudden stops.
Practice tip: Find a small patch of loose gravel (like a dirt road or a gravel parking lot) and ride back and forth at a slow, steady speed. Focus on staying relaxed and keeping the bike straight. It will feel awkward at first, but you’ll get the hang of it in a few minutes.
2. Braking on Gravel (Avoid Skidding)
Braking on gravel is different from braking on pavement—loose gravel has less traction, so you need to brake more gently to avoid skidding (which can cause you to lose control).
- Use both brakes: Always use both front and rear brakes—this distributes the stopping power and reduces the risk of skidding. Use 70% of your braking power on the front brake and 30% on the rear (this is the same as road biking).
- Brake early: Brake before you hit a loose patch, not during. This gives you time to slow down gradually and maintain control.
- Avoid sudden braking: If you need to stop quickly, squeeze the brakes gently (don’t jab them) and keep your weight centered. If your wheels start to skid, release the brakes slightly and then squeeze them again more gently.
3. Climbing Gravel Hills (No Walking Allowed!)
Gravel hills can be challenging, but with the right gear and technique, you can climb them without walking. Here’s how:
- Shift to a low gear before the hill: Don’t wait until you’re struggling to shift—shift to a low gear (easy to pedal) before you start climbing. This keeps your cadence (pedal speed) steady.
- Maintain a steady cadence: Aim for a cadence of 70–90 revolutions per minute (RPM). Pedaling faster (higher cadence) is easier on your legs than pedaling slower (lower cadence) on gravel hills.
- Stay seated: Stand up only if you need extra power—sitting down keeps your weight centered and maintains traction on the rear wheel. If you do stand up, keep your body over the bottom bracket and pedal smoothly.
- Look ahead: Focus on the top of the hill, not your front wheel. This helps you stay motivated and adjust to any rough spots on the climb.
4. Descending Gravel Hills (Stay in Control)
Descending gravel hills is fun, but it can be scary for beginners. The key is to stay in control and avoid going too fast too soon:
- Keep your weight back: Shift your weight slightly back (over the rear wheel) to maintain traction and avoid flipping over the handlebars.
- Use your brakes gently: Brake periodically to control your speed—don’t ride too fast for the terrain. Avoid braking hard on loose gravel.
- Stay relaxed: Keep your grip loose and your arms slightly bent. This allows you to absorb bumps and maintain control if the bike hits a rough spot.
- Choose the best line: Look for the smoothest, most packed part of the road (avoid deep loose gravel or ruts). If you see a rough spot, slow down slightly and ride through it straight.
5. Cornering on Gravel (Avoid Sliding)
Cornering on gravel requires a little more care than cornering on pavement. Here’s how to do it safely:
- Slow down before the corner: Don’t corner at high speed—slow down before you enter the corner, then maintain a steady speed through the corner.
- Keep your weight centered: Don’t lean too far into the corner (like you would on a road bike)—keep your body upright and your weight centered over the bike. This helps maintain traction on both wheels.
- Look through the corner: Look where you want to go (the exit of the corner), not at the ground. This helps you stay balanced and choose the best line.
- Avoid braking in the corner: Brake before the corner, not during. Braking in the corner can cause your wheels to skid and lose control.
Planning Your First Gravel Ride (Start Small, Have Fun!)
Now that you have your bike, gear, and basic skills, it’s time to plan your first gravel ride. The key is to start small and keep it fun—don’t try to ride 50 miles on rough gravel on your first day. Here’s how to plan a beginner-friendly gravel ride:
Step 1: Choose the Right Route
Look for routes that are beginner-friendly—flat to rolling terrain, smooth gravel (not deep, loose gravel), and a mix of pavement and gravel (to ease into it). Here are the best places to find beginner gravel routes:
- Navigation Apps: Strava, Komoot, and Ride with GPS have thousands of user-created gravel routes. Filter for “beginner” or “easy” routes, and look for routes with low elevation gain (less than 500 feet per 10 miles) and smooth terrain.
- Local Bike Shops: Your local bike shop knows the best beginner gravel routes in your area—ask them for recommendations. They might even have group rides for beginners.
- Friends or Family: If you have friends who ride gravel, ask them to take you on a beginner-friendly route. Riding with someone more experienced is a great way to learn and stay safe.
Route length for beginners: Start with 10–15 miles. This is long enough to get a feel for gravel biking, but not so long that you get exhausted. As you gain experience, you can increase the length of your rides.
Step 2: Check the Weather and Terrain
Gravel riding is best in dry conditions—wet gravel is slippery and can be dangerous for beginners. Check the weather forecast before your ride, and avoid riding if it’s raining or has rained recently (gravel roads can turn to mud).
Also, check the terrain—avoid routes with deep mud, large rocks, or steep hills (unless you’re ready to challenge yourself). Stick to smooth, packed gravel for your first few rides.
Step 3: Prepare Your Bike and Gear
The night before your ride, prepare your bike and gear to avoid last-minute stress:
- Check your bike: Inflate your tires to the recommended pressure, check your brakes (make sure they stop smoothly), and test your gears (make sure they shift smoothly). Look for any loose bolts or strange noises.
- Pack your gear: Put your flat tire repair kit, water bottle, ID, and snacks (if needed) in your bag or bike pockets. Wear your cycling shorts, helmet, and sunglasses.
- Charge your devices: If you’re using a GPS or phone for navigation, charge it fully. Download your route offline (in case you lose cell service).
Step 4: During the Ride—Take It Slow and Enjoy
On your first gravel ride, forget about speed—focus on having fun and practicing your skills. Here are a few tips to make your ride enjoyable:
- Ride at your own pace: Don’t push yourself too hard—if you’re tired, slow down or stop for a break. Gravel biking is about exploration, not speed.
- Stop and take breaks: Stop every 3–4 miles to stretch, drink water, and enjoy the scenery. This helps prevent fatigue and makes the ride more fun.
- Practice your skills: Use the loose gravel sections to practice riding straight, braking, and cornering. The more you practice, the more confident you’ll feel.
- Don’t worry about mistakes: Everyone makes mistakes when they’re learning—if you skid or lose control, just laugh it off and try again. The most important thing is to stay safe and have fun.
Common Mistakes Beginners Make (And How to Avoid Them)
Even the best beginners make mistakes—but knowing what to look out for can help you avoid frustration and stay safe. Here are the most common mistakes beginners make in gravel biking, and how to fix them:
Mistake 1: Riding Too Fast Too Soon
Many beginners get excited and ride too fast on gravel, which leads to loss of control. Fix: Take it slow—start at a speed where you feel comfortable, and gradually increase your speed as you gain confidence. Remember: gravel biking is not about speed, it’s about control.
Mistake 2: Using Too High Tire Pressure
Beginners often use road bike tire pressure (80–100 psi) on gravel tires, which makes the ride bumpy and reduces traction. Fix: Lower your tire pressure to 25–35 psi (depending on tire size and your weight). This will make the ride more comfortable and improve traction on loose gravel.
Mistake 3: Death-Gripping the Handlebars
When riding on loose gravel, beginners often grip the handlebars too tightly, which makes it harder to maintain control. Fix: Relax your grip—keep your hands loose, and let the bike move slightly under you. This helps the bike stay balanced on rough terrain.
Mistake 4: Not Bringing a Flat Tire Repair Kit
Flat tires are inevitable on gravel, but many beginners forget to bring a repair kit. Fix: Always bring a flat tire repair kit (inner tubes, tire lever, pump/CO2) on every ride. You don’t want to be stuck in a remote area with a flat tire and no way to fix it.
Mistake 5: Choosing the Wrong Route
Beginners often choose routes that are too difficult (steep hills, deep gravel, mud), which leads to frustration and burnout. Fix: Start with flat to rolling terrain and smooth gravel. As you gain experience, you can tackle more challenging routes.
Growing as a Gravel Rider (Where to Go From Here)
Once you’ve mastered the basics and completed a few beginner rides, you might be wondering how to grow as a gravel rider. Here are a few tips to take your gravel biking to the next level:
- Join a Gravel Group Ride: Group rides are a great way to meet other gravel riders, learn new routes, and get tips from more experienced riders. Many local bike shops and cycling clubs host beginner-friendly gravel group rides.
- Try a Gravel Event or Race: Gravel events (like gran fondos or gravel centuries) are fun, non-competitive rides that let you challenge yourself and ride with other gravel enthusiasts. Most events have beginner-friendly distances (25–50 miles) and support stations (with water, snacks, and repairs).
- Upgrade Your Gear Gradually: As you gain experience, you can upgrade your gear to make your rides more enjoyable. For example, you might want to upgrade your tires to a more traction-focused model, add a handlebar bag for longer rides, or invest in a better pair of cycling shorts.
- Explore New Terrain: Once you’re comfortable on smooth gravel, try exploring more challenging terrain (like rough gravel, dirt trails, or light mud). This will help you build your skills and keep your rides exciting.
- Set Goals: Set small, achievable goals to keep yourself motivated. For example, your goal could be to ride 20 miles, climb a steep gravel hill without walking, or complete a gravel event. Celebrate your achievements—no matter how small!
Final Thoughts: Embrace the Freedom of Gravel Biking
Gravel biking is more than just a sport—it’s a way to escape, explore, and connect with the outdoors. As a beginner, the most important thing is to start simple, have fun, and not be afraid to make mistakes. You don’t need expensive gear or elite skills—you just need a bike, a helmet, and a willingness to ride where the pavement ends.
Remember: there’s no “right” way to gravel bike. Some riders take it slow and enjoy the scenery, while others push themselves to ride farther and faster. Whatever your style, gravel biking is about embracing the freedom to ride anywhere, anytime, and at your own pace.
So, grab your bike, lace up your shoes, and hit the gravel. You’ll be surprised by how much fun it is—and how quickly you fall in love with this versatile, inclusive sport. The road (or gravel path) ahead is waiting—happy riding!